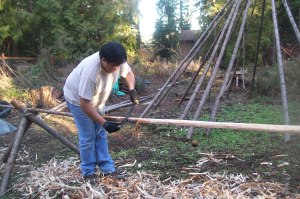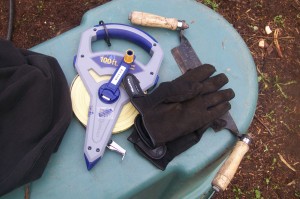
Step 1 – Tools, worksite, tripods, and poles

These poles were harvested last summer in MT. Although fresh poles are easier to clean, I’ve learned if you let them dry longer, they crack less and you don’t have sap covering everything when you scrape them. Any trees can really be used, as long as they are straight, long enough, and narrow, no more than 3-4 inches at the base
Step 1. Find poles. This usually happens with trial and error, and lots of time walking around, looking up, in forests. My family has found out that I am super picky when it comes to poles. They usually look good from far, but far from good. Since this step is complete, I won’t go into it, but I warn you it does take alot to get even to this step, planning, a truck, and helpers, lots of them if possible.

These items are essential to cleaning poles. Without gloves, you’ll have blisters by your 3rd pole. The measuring tape helps you to make sure your poles are the size you need, and the draw knife is what does the work. Just remember the sharper you keep your draw knife, the deeper it can cut if you don’t know what you’re doing or cutting, so I reccommend trying it the way it comes before you try to put a razor’s edge on it, you may find out that is all you need. Btw, good draw knives can be picked up for $12-$20, so don’t think you need a $50 tool, especially when starting out.
Some tipi experts claim you need sawhorses and bungees to hold down your tipi poles while you are cleaning them, but I have found out that a simple tripod made out of the extra lengths of tipi poles you don’t need (and if you have a spouse like mine, there is no doubt you’ll end up with a 40 foot tree, wayy longer than you need, love you Jenn ![]() ). Two tripods are needed, so 6 additional pieces of poles are needed at least 4-5 feet long. when I measure out my tripod, I put it at the angle I will likely tie it at and mark near “crotch” height, because when you have your pole on the tripod, you’ll be straddling it. Even an inch or two higher is okay because usually your rope will settle and its also best to bury the first inch or two if your tripod poles into the ground to keep them from moving on you.
). Two tripods are needed, so 6 additional pieces of poles are needed at least 4-5 feet long. when I measure out my tripod, I put it at the angle I will likely tie it at and mark near “crotch” height, because when you have your pole on the tripod, you’ll be straddling it. Even an inch or two higher is okay because usually your rope will settle and its also best to bury the first inch or two if your tripod poles into the ground to keep them from moving on you.
Step 2- Cleaning poles
Because I don’t want to bore you, I won’t go into lashing poles together or some of the technical things. Just know that it should feel right. Slap a pole on the tripods, make sure its the right height, that the tripod is not angled to be in your way, and that they are far enough away to move the pole around, but not so far apart that you pole is sagging…do it a couple times, you’ll become a master. One set of tripods should last you for years, my friend Dirty Belly and I even have a couple tripods we left in the mountains of MT…and the last time I was up there, they were still up and ready for work!
4. Pitch pitch pitch. the pitch of your draw knife is essential to understand. Too much, and you’ll dig in deep, too little, and you may not be taking anything off. Understand and practice which angle is best for each area of the pole. Pitch is especially critical on the top, where a mess up could result in you lopping off the top of your pole.
5. Even poles that have imperfections may be used. After you scrape/shape your poles, you may not even notice what you thought was a problem.
6. Like when riding a horse, use your thighs to keep you in control. With that being said, wear some pants you don’t mind staining or destroying.
After I finished cleaning the first three poles, I tied them together to form a tripod to keep the rest of the poles I will clean off the ground. Because no tipi is going on these poles, I didn’t measure out were I was tying them, I only went ~2/3′s way up the pole, with ~1/3 of the pole above the tie point. This helps to keep the poles from sagging if they are fresh. Once they were ready, I lifted them off the ground and used a tool to give me a little leverage to help me pull them skyward. Without that shovel, it is all but nearly impossible to get them off the ground. Trust me. I tried that before.
And this is my end result. When lifting the tripod in the air, make sure that the bases are anchored somehow, either with stakes, or like I did, I dug a small hole for the pole to stay in while lifting. Also don’t pull past the center or they will come crashing down on you. Once your tripod is up, you can move it wherever you’d like even with only one person. I just “crawl” the tripod into place, one pole at a time. Okay…..enough for one day…I plan on cleaning at least a set to take to CC, I should have enough 23′-25′ poles to make up one set of 17 (15 for the tipi, 2 for the smoke flap poles). Hetche to. Time for some ibuprofen and sleep .


